前言
最近我想要一个既酷又实用的 Windows 屏保,最终选择了自己搭建的 Plex 媒体库的海报墙作为素材,打造一个 本地运行、动态轮播、模糊背景 的高颜值屏保页面。整个过程折腾了半天,最终成功,特此记录完整配置流程,供大家参考。
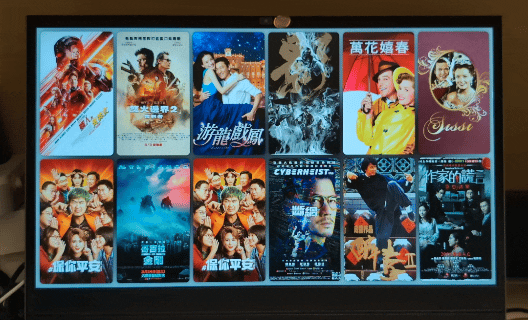
🧱 最终效果一览
✅ 使用 Plex 动态封面
✅ 高斯模糊背景自动轮换
✅ 屏幕保护程序自动启动
✅ ALT + F4 可退出屏保
✅ 本地 HTML,离线运行,性能流畅
💡 技术原理概览
- 使用 HTML + JS + CSS 编写本地海报墙页面
- 从 Plex Server 获取封面数据
- 用 AutoHotkey 将页面打包为
.exe - 改后缀为
.scr作为 Windows 屏保程序使用 - 手动设置为系统屏保,效果如下:
🔒 电脑空闲 1 分钟后自动启动全屏 Plex 动态海报墙
🚪 ALT + F4 可退出屏保,继续工作
开始实操
📄 第一步:创建本地 Plex 海报墙页面
保存为D:\plex_wall1.html,HTML 内容如下:
⚠️ 请将PLEX_TOKEN、SERVER_URL、LIBRARY_ID替换为你自己的 Plex 设置。
<!DOCTYPE html>
<html lang="en">
<head>
  <meta charset="UTF-8" />
  <title>Plex 海报墙</title>
  <style>
    html, body {
      margin: 0; padding: 0;
      width: 100vw; height: 100vh;
      overflow: hidden;
      font-family: sans-serif;
    }

    #bgBlurImg {
      position: fixed;
      top: 0; left: 0;
      width: 100%; height: 100%;
      object-fit: cover;
      z-index: -1;
      filter: blur(40px) brightness(0.5);
      transition: opacity 1s ease-in-out;
    }

    .grid {
      display: grid;
      grid-template-columns: repeat(6, 1fr);
      grid-template-rows: repeat(2, 1fr);
      gap: 12px;
      padding: 12px;
      width: 100vw; height: 100vh;
      box-sizing: border-box;
    }

    .poster {
      width: 100%; height: 100%;
      object-fit: cover;
      border-radius: 12px;
      box-shadow: 0 0 8px rgba(0, 0, 0, 0.6);
      transition: opacity 1s ease;
    }

    .fade-out { opacity: 0; }

    .info {
      position: absolute;
      bottom: 20px; left: 20px;
      background: rgba(0,0,0,0.6);
      color: white;
      font-size: 16px;
      padding: 8px 16px;
      border-radius: 8px;
      pointer-events: none;
    }
  </style>
</head>
<body>
  <img id="bgBlurImg" src="" alt="background" />
  <div class="info" id="infoBox"></div>
  <div class="grid" id="posterGrid"></div>

  <script>
    const PLEX_TOKEN = "你的_PLEX_TOKEN";
    const SERVER_URL = "http://你的_PLEX服务器IP:32400";
    const LIBRARY_ID = 7;

    const MAX_VISIBLE = 12;
    const REPLACE_INTERVAL = 3000;
    const BACKGROUND_INTERVAL = 60000;

    let posterData = [];
    let postersOnScreen = [];

    async function fetchPosters() {
      const res = await fetch(`${SERVER_URL}/library/sections/${LIBRARY_ID}/all?X-Plex-Token=${PLEX_TOKEN}`);
      const text = await res.text();
      const xml = new DOMParser().parseFromString(text, "text/xml");
      const videos = xml.querySelectorAll("Video");
      videos.forEach(video => {
        const thumb = video.getAttribute("thumb");
        const title = video.getAttribute("title");
        const year = video.getAttribute("year") || "";
        if (thumb) {
          posterData.push({
            url: `${SERVER_URL}${thumb}?X-Plex-Token=${PLEX_TOKEN}`,
            title, year
          });
        }
      });
    }

    function getRandomPoster() {
      return posterData[Math.floor(Math.random() * posterData.length)];
    }

    function createPoster(data) {
      const img = document.createElement("img");
      img.className = "poster";
      img.src = data.url;
      img.dataset.title = data.title;
      img.dataset.year = data.year;
      img.addEventListener("mouseenter", () => {
        document.getElementById("infoBox").textContent = `${data.title} (${data.year})`;
        document.getElementById("infoBox").style.opacity = 1;
      });
      img.addEventListener("mouseleave", () => {
        document.getElementById("infoBox").style.opacity = 0;
      });
      return img;
    }

    function initPosters() {
      const grid = document.getElementById("posterGrid");
      grid.innerHTML = "";
      postersOnScreen = [];
      for (let i = 0; i < MAX_VISIBLE; i++) {
        const data = getRandomPoster();
        const img = createPoster(data);
        grid.appendChild(img);
        postersOnScreen.push(img);
      }
    }

    function cyclePosters() {
      setInterval(() => {
        const index = Math.floor(Math.random() * postersOnScreen.length);
        const img = postersOnScreen[index];
        const data = getRandomPoster();
        img.classList.add("fade-out");
        setTimeout(() => {
          img.src = data.url;
          img.dataset.title = data.title;
          img.dataset.year = data.year;
          img.classList.remove("fade-out");
        }, 1000);
      }, REPLACE_INTERVAL);
    }

    function updateBackground() {
      const img = document.getElementById("bgBlurImg");
      const data = getRandomPoster();
      img.style.opacity = 0;
      setTimeout(() => {
        img.src = data.url;
        img.onload = () => { img.style.opacity = 1; };
      }, 200);
    }

    async function start() {
      await fetchPosters();
      initPosters();
      cyclePosters();
      updateBackground();
      setInterval(updateBackground, BACKGROUND_INTERVAL);
    }

    start();
  </script>
</body>
</html>
🔧 第二步:将 HTML 页面打包为.scr屏保程序
✅ 使用 AutoHotkey(推荐方式)
安装 AutoHotkey:官网地址在这里
新建脚本screensaver.ahk:
Run, "C:\Program Files (x86)\Microsoft\Edge\Application\msedge.exe" --kiosk "file:///D:/plex_wall1.html" --edge-kiosk-type=fullscreen --no-first-run --disable-infobars
Return
右键 → 编译脚本 → 生成 screensaver.exe
重命名为plex_wall.scr,放到C:\Windows\System32\
⚙ 第三步:设置为系统屏保
- 打开 设置 → 个性化 → 锁屏界面 → 屏幕保护程序设置
- 选择你刚生成的
plex_wall.scr - 设置 1 分钟启动,点击“预览”测试
退出方式为 Alt + F4
你当前没有启用鼠标或键盘退出功能,所以需要通过Alt + F4关闭窗口退出屏保。
如想自动退出,可加上监听:
✅ 总结
这个 Plex 屏保项目虽然踩了些坑,但最终效果令人惊艳:
- 可个性化媒体展示
- 响应迅速,画面精美
- 支持本地运行,完全脱离浏览器框架
- 可部署到任意电脑
不只是 Plex,换成任何支持封面 API 的媒体源(如 Jellyfin、TMDB、IMDB)都可以照样做!
🧠 如果你也想自定义自己的“艺术级”屏保,不妨参考这个方法尝试一下。
发表回复